(Kimba GRACIOUSLY is allowing me to post about the exact same item I did last week. I certainly never expected the response I got!! Thank you each and every one of you for your AMAZINGLY kind comments and emails. Check out the rest of the GREAT items on DIY Tuesday. THANKS KIMBA!)
Several folks have asked me how my sweet girl became the beauty that she is (and prior to yesterday’s post, I never EVER referred to her as, “my sweet girl” or even gave her a gender! Ah what blogging will do to ya…)
First off let me assure you that DFE is well spoken for and… well… not available. (AWKWARD!) Though I am sure if you were in the area (and he were in the area) that he’d be happy to assist, but alas he is regretfully back in his home country (though my many projects on my list that have E written besides them keep growing and growing… November 8th just can’t get here quick enough!). But I digress…
So, in lieu of a DFE, a DH or any other semi-handy male-type specimen in your life will do just perfectly fine (I absolutely cannot believe I just wrote that (head hanging in shame) (head hanging further in shame as I realize I just put a parenthetical statement WITHIN a parenthetical statement!) YOU CAN DO THIS YOURSELF!!! I just couldn’t. But you could. Oh yes you can!).
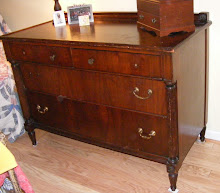
ANYHOW – obviously you need a good SOLID dresser. I say solid because of the revamping, etc., that needs to get done, you need to make sure whatever you use can withstand the alterations (ie particle board – probably not gonna do it for ya).
A good prybar, sawzall, and general tools (screwdrivers, hammer, etc.) should be handy.
Remove all the drawers and then figure out how the top is attached and remove that. My goal was to reuse nearly every thing I took off, so we didn’t throw a single piece of wood, screw or bracket away (Did I mention the test of our relationship? Enter OCD me with laid-back DFE. “WHAT DO YOU MEAN YOU THREW THAT SCREW OUT???” “It was bent and the head was missing.” “SO?!?!?!!”)
The top of my dresser was sitting on a BEAUTIFUL piece of molding. “We” (ha ha ha) carefully removed it and DFE reconfigured it to frame the very top.
Then “we” removed the pieces that framed the area for the top 2 drawers. At this point we knew we were only keeping one of the drawers, so we figured out which bottom of which drawer looked the best and retained the least amount of smoke-smell and cut the piece down so that the top now lay flat. (Ok, I’m just gonna stop saying we now, by this point this project was all DFE. As a matter of fact, he FORBID me from coming into his workshop until it was done.)
I was lucky in that the piece I had was WELL built and instead of the drawers just sliding in and out on a track, each drawer sat on its own shelf. This made the top and bottom shelf easy-peasy and gave us the perfect piece to do the middle shelf. So at this point all we had to do was figure out the spacing.
I thought one day I’d like to have spacers for plates (#7 on my list with an “E” beside it), so we made sure one shelf would have enough height to accommodate the plates. The bottom shelf and top shelf were “obvious” because those are exactly where they were to begin with. So all DFE had to do was position the middle shelf. He did this by placing mimicking exactly how they were done when they held drawers, setting the shelf in and reinforced it from the outside with some countersunk screws.
After all of this, it was merely a matter of finishing out all the open pockets/areas that would normally have been covered by closed drawers. Again, DFE did all of this using scrap pieces of drawers and stuff.
Finally, the call I had been anticipating… she was done. I still had the black paint from when I originally painted it, so I (DFE graciously allowed me to paint it) finished it all off.
I L.O.V.E. this piece of furniture. It’s one of my “5 Pieces of Furniture I’ll Never Get Rid Of.” (Yes, I have a list – don’t you??)


